


Are you looking for an easy, creative, and budget-friendly way to keep your home organized? A DIY coat rack is not only practical but also a fun project that allows you to customize your space while saving money. Whether you’re a seasoned DIY enthusiast or a beginner, making your own coat rack is easier than you think. In this article, we’ll walk you through everything you need to know—from choosing the best materials to creating unique designs that fit your style and space.
What is a DIY Coat Rack?
A DIY coat rack is a handmade structure designed to hold coats, jackets, scarves, and other outerwear. Unlike store-bought coat racks, DIY versions give you the freedom to customize the size, design, and materials to match your needs and home decor. They can be as simple as a wooden plank with hooks or as elaborate as a freestanding rack with additional storage features. With a little creativity, you can turn almost any item into a functional coat rack that reflects your personal style.
DIY coat racks are incredibly versatile and can be mounted on the wall, placed in a corner, or even designed as portable units. They’re perfect for entryways, mudrooms, bedrooms, and small apartments. Plus, they allow you to repurpose old materials, which is both eco-friendly and cost-effective.
Why Make Your Own Coat Rack?
Making your own coat rack comes with numerous benefits, especially when compared to buying a pre-made one from a store. Here are a few reasons why creating a DIY coat rack is a great idea:
- Customization: You can design your coat rack to fit your space, needs, and style perfectly. Whether you prefer a rustic look, a modern design, or a whimsical creation, the choice is yours.
- Affordability: DIY coat racks are budget-friendly. With some basic tools and inexpensive materials, you can create something that looks high-end without breaking the bank.
- Eco-Friendly: Building a coat rack from repurposed or upcycled materials helps reduce waste and makes your project more sustainable.
- Personal Satisfaction: There’s something incredibly rewarding about making something with your own hands. It’s a fun and creative project that can involve the whole family.
Materials You’ll Need for a DIY Coat Rack
Before you dive into your project, it’s essential to gather the right materials. The materials you choose will depend on the type of coat rack you’re making, but here are some common items you’ll need:

- Wood: Pine, oak, or reclaimed wood works well for sturdy coat racks.
- Hooks: Metal hooks for hanging coats are available in a variety of styles and finishes.
- Screws and Nails: To attach the hooks and secure the structure.
- Paint or Stain: This is used to customize the colour and finish of your coat rack.
- Sandpaper: To smooth out rough edges.
- Drill or Screwdriver: This is used to attach hooks and assemble the structure.
- Measuring Tape: To ensure everything is even and aligned.
Best Wood for DIY Coat Racks
When it comes to selecting wood, durability and appearance are key. Here are some great options:
- Pine: Lightweight and easy to work with, pine is perfect for beginners.
- Oak: A sturdy option with a beautiful grain, oak is ideal for long-lasting coat racks.
- Reclaimed Wood: Eco-friendly and full of character, reclaimed wood adds a rustic charm to your project.
Where to Find Hooks for Cheap
Hooks are an essential component of your coat rack, and you can find them at affordable prices in the following places:
- Local hardware stores
- Online retailers like Amazon or eBay
- Thrift stores and flea markets
- Dollar stores, which often carry basic hooks
How to Prep Your Materials
Proper preparation is the key to a successful DIY project. Here’s how to prep your materials:
- Sand the Wood: Use sandpaper to smooth out the surface of your wood and eliminate any splinters.
- Measure and Mark: Plan where you’ll place the hooks and mark the positions with a pencil.
- Prime and Paint/Stain: Apply a coat of primer or a stain if you’re painting to enhance the wood’s natural beauty. Allow it to dry completely before assembly.
Step-by-Step Guide to Making a DIY Coat Rack
Ready to start building your coat rack? Follow these simple steps:
- Choose a Design: Decide on the type of coat rack you want—wall-mounted, freestanding, or a unique upcycled version.
- Cut the Wood: Measure and cut the wood to your desired size and shape. For example, a wall-mounted rack might require a single plank, while a freestanding rack might need multiple pieces.
- Sand the Edges: Smooth the edges of the wood to ensure a polished look and prevent splinters.
- Paint or Stain: Customize the wood with paint or stain. Use multiple coats for a durable finish.
- Attach the Hooks: Drill holes where you’ve marked and secure the hooks with screws.
- Assemble the Structure: For freestanding racks, attach the legs or base for stability.
- Mount or Place: Install the coat rack on your wall or place it in your desired location.
Creative DIY Coat Rack Ideas
If you’re looking for inspiration, here are some creative DIY coat rack ideas to try:
- Rustic Ladder Rack: Turn an old wooden ladder into a freestanding coat rack.
- Driftwood Design: Use a piece of driftwood and attach hooks for a coastal vibe.
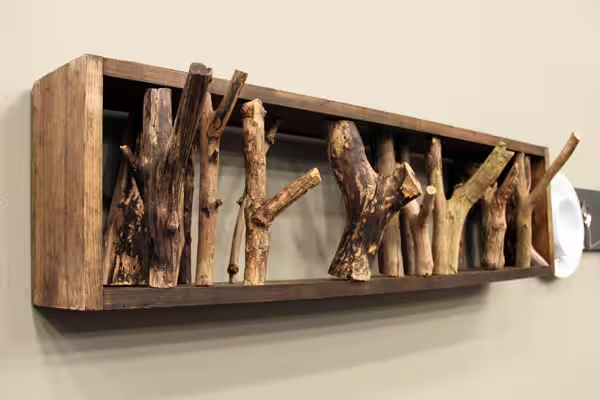
- Tree Branch Rack: Paint and seal a sturdy branch to create a nature-inspired coat rack.
- Pipe and Wood Rack: Combine industrial pipes with a wooden base for a modern look.
- Pegboard Rack: Mount a pegboard on your wall and add hooks for a versatile solution.
DIY Coat Rack for Small Spaces
Living in a small apartment or home doesn’t mean you have to sacrifice organization. Here are some ideas for compact coat racks:
- Wall-Mounted Racks: Save floor space by attaching your coat rack directly to the wall.
- Over-the-Door Hooks: An easy solution for renters, these racks hang over your door without the need for installation.
- Corner Racks: Utilize unused corners by building a triangular coat rack that fits snugly into tight spaces.
Upcycling Items for Coat Racks
Get creative by repurposing everyday items into coat racks. For example:
- Old chair backs
- Wooden pallets
- Vintage skis or paddles
- Old door knobs or handles
Wall-Mounted vs. Freestanding Coat Racks
- Wall-Mounted: Ideal for small spaces, these racks keep your floor clear and are easy to install.
- Freestanding: These racks offer flexibility and can be moved around as needed. They’re perfect for entryways or mudrooms.
How to Add Extra Storage
Need more functionality? Add shelves or baskets to your coat rack to store shoes, hats, and other accessories. For example, a wall-mounted rack with a top shelf can double as a place to display decor items.
Tips to Customize Your Coat Rack
Customization is what makes a DIY coat rack truly special. Here are some tips:
- Add a Personal Touch: Paint it in your favourite colours, stencil it on a design, or add decorative elements like knobs or beads.
- Experiment with Finishes: Use a distressed paint finish for a rustic look or a glossy coat for a sleek, modern vibe.
- Incorporate Other Materials: Combine wood with metal, rope, or fabric for a unique design.
The Bottom Line
Making a DIY coat rack is a simple and enjoyable project that offers endless possibilities for creativity. Not only will you have a practical piece to keep your home organized, but you’ll also have the satisfaction of creating something uniquely yours. Whether you’re working with reclaimed wood, upcycling old items, or crafting from scratch, the result is a functional and beautiful addition to your space.
So, grab your tools and start building the perfect coat rack for your home today! It’s a project that’s as rewarding as it is useful—and one that anyone, even beginners, can tackle with confidence.